


 Thanks:
  Likes:
Here are pictures of warped rotors being cut on a lathe. One is a standard lathe and one is an on the car lathe. You can see the non cut surface (shiny part) thats due to wapring of the rotor. The lathes cutting bit stays in the same spot (laterally) and works its way from the inside to the outside of the rotor. The shiny parts are where the bit did not touch the rotor due to that part being further away from the bit.
While cutting rotors this can also happen if you do not put the rotor on the lathe correctly (or have a bent shaft on the lathe)....so usually when you see this while cutting rotors, you double check to verify you have the rotor set on the lathe straight.
The first picture shows minor warping. This is very common and appears on almost every rotor that you would cut....especially if you do very shallow cuts over and over again until the rotor is true. This is the preferred method since it only takes off just enough metal and not too much. The goal is to keep the rotors as thick as possible. The thicker they are, the more efficiently the disipate the heat produced by braking.
The second image is a more severely warped rotor. When you compare the two, you can see that there is a sudden difference as opposed to something that is gradual like the first image. When rotors are in this condition, you run more of a risk of taking off too much metal and machining them so far that they are below the discard specs by the time you are done.
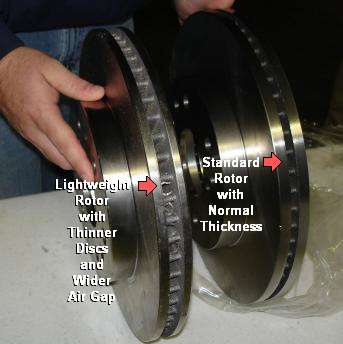
Warping rotors have become more and more of a problem in the recent years. Parts companies are cutting costs any way they can. They make their rotors vents and surfaces thinner now. These "light weight" rotors do not dissipate the heat of braking like they should and they sure as hell do get hot enough to warp. Take a look at the third image.


Bookmarks